
1er container
Insertamos positioned container
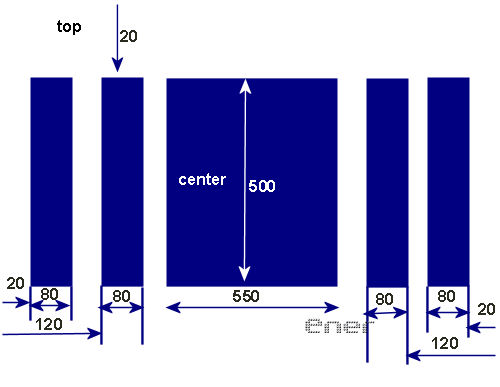
Horizontal layout:
Marcamos la opcion "Set position and width"
Leff:20
Size: 80
Vertical layout:
Marcamos la opcion " Set position and height"
Top:20
Size:500
Insertamos frame : transparente
Insertamos background, no scroll ( este es el cielo estrellado)
Ir a preview
2º container
2-, Insertamos positioned container
Horizontal layout:
Marcamos la opcion "Set position and width"
Leff:120
Size: 80
Vertical layout:
Marcamos la opcion " Set position and height"
Top:20
Size:500
Insertamos frame : transparente
Insertamos background, no scroll ( el mismo de antes )
Ir a preview
3er Container
3-, Insertamos positioned container
Horizontal layout:
Marcamos la opcion "Set position and width"
Right:20
Size: 80
Vertical layout:
Marcamos la opcion " Set position and height"
Top:20
Size:500
Insertamos frame : transparente
Insertamos background, no scroll ( el mismo de antes )
Ir a preview
4º Container
4-, Insertamos positioned container
Horizontal layout:
Marcamos la opcion "Set position and width"
Right:120
Size: 80
Vertical layout:
Marcamos la opcion " Set position and height"
Top:20
Size:500
Insertamos frame : transparente
Insertamos background, no scroll ( el mismo de antes )
Ir a preview
5º container
Insertamos positioned container
Horizontal layout:
Marcamos la opcion "Set position and width"
Center: 0
Size: 550
Vertical layout:
Marcamos la opcion " Set position and height"
Top:20
Size:500
Insertamos frame : transparente
Insertamos background, no scroll ( el mismo de antes )
Insertar position image con el ultimo positioned container pulsado
Horizontal position : center
Vertical position : botton
Ir a preview
Insertar message area
Vamos a ver como calcular ahora nuestro espacio para el mensaje
como la imagen mide 500 de alto, y dejamos 20 desde el top tenemos 520 pues sumamos lo que queremos dejar de separacion, en este caso ponemos 600 , esto implica 80 de separación desde que termina nuestra imagen superior y donde comienza nuestro mensaje
Left: 30
Top: 600
Right:30
Botton:30
Insertar sound, tiker, y barras de colores si teneis la version 3.1
guardar el Scrippy y ahora vamos a ver como meter el floating
Para ello abrimos exportamos nuestro trabajo para abrirlo bien con el Outlook o como pagina web, y aparte de poner las url de todos los elementos que hemos incluido en nuestro scrippy como imagenes y musica vamos a irnos ahora al final
Copiar el script del floating que hay a continuacion
Nos vamos al final del todo y detrás del último </script> antes de esto: <DIV id=SCE></DIV></BLOCKQUOTE></BODY></HTML>
Insertamos el codigo del floating, sustituimos lo que esta en rojo por la URL de la imagen que será empleada como floating, en mi caso el corazoncito azul que podeis copiar directamente desde el comienzo de este tutorial
*FLOATING ( cambiar solo lo que esta en rojo)
</SCRIPT><!-- HERE COMES THE FLAKE GIF, YOU CAN ALSO ADJUST THE VALUES OF VAR NO AND VAR SPEED--><IMG
id=snowtemp style="DISPLAY: none"
src="DIRECCION DE NUESTRA IMAGEN, ejemp: C/archivos de programas/tubes">
<SCRIPT language=JavaScript1.2>
var no = 12; // snow number
var speed = 1; // smaller number moves the snow faster
var snowflake = snowtemp.src;
var ns4up = (document.layers) ? 1 : 0; // browser sniffer
var ie4up = (document.all) ? 1 : 0;
var dx, xp, yp; // coordinate and position variables
var am, stx, sty; // amplitude and step variables
var i, doc_width = 800, doc_height = 615;
if (ns4up) {
doc_width = self.innerWidth;
doc_height = self.innerHeight;
} else if (ie4up) {
doc_width = document.body.clientWidth;
doc_height = document.body.clientHeight;
}
dx = new Array();
xp = new Array();
yp = new Array();
am = new Array();
stx = new Array();
sty = new Array();
for (i = 0; i < no; ++ i) {
dx[i] = 0; // set coordinate variables
xp[i] = Math.random()*(doc_width-50); // set position variables
yp[i] = Math.random()*doc_height;
am[i] = Math.random()*20; // set amplitude variables
stx[i] = 0.02 + Math.random()/10; // set step variables
sty[i] = 0.7 + Math.random(); // set step variables
if (ns4up) { // set layers
if (i == 0) {
document.write("<layer name=\"dot"+ i +"\" left=\"15\" ");
document.write("top=\"15\" visibility=\"show\"><img src=\"");
document.write(snowflake + "\" border=\"0\"></layer>");
} else {
document.write("<layer name=\"dot"+ i +"\" left=\"15\" ");
document.write("top=\"15\" visibility=\"show\"><img src=\"");
document.write(snowflake + "\" border=\"0\"></layer>");
}
} else if (ie4up) {
if (i == 0) {
document.write("<div id=\"dot"+ i +"\" style=\"POSITION: ");
document.write("absolute; Z-INDEX: "+ i +"; VISIBILITY: ");
document.write("visible; TOP: 15px; LEFT: 15px;\"><img src=\"");
document.write(snowflake + "\" border=\"0\"></div>");
} else {
document.write("<div id=\"dot"+ i +"\" style=\"POSITION: ");
document.write("absolute; Z-INDEX: "+ i +"; VISIBILITY: ");
document.write("visible; TOP: 15px; LEFT: 15px;\"><img src=\"");
document.write(snowflake + "\" border=\"0\"></div>");
}
}
}
function snowNS() { // Netscape main animation function
for (i = 0; i < no; ++ i) { // iterate for every dot
yp[i] += sty[i];
if (yp[i] > doc_height-50) {
xp[i] = Math.random()*(doc_width-am[i]-30);
yp[i] = 0;
stx[i] = 0.02 + Math.random()/10;
sty[i] = 0.7 + Math.random();
doc_width = self.innerWidth;
doc_height = 515;
}
dx[i] += stx[i];
document.layers["dot"+i].top = yp[i];
document.layers["dot"+i].left = xp[i] + am[i]*Math.sin(dx[i]);
}
setTimeout("snowNS()",speed);
}
function snowIE() { // IE main animation function
for (i = 0; i < no; ++ i) { // iterate for every dot
yp[i] += sty[i];
if (yp[i] > doc_height-50) {
xp[i] = Math.random()*(doc_width-am[i]-30);
yp[i] = 0;
stx[i] = 0.02 + Math.random()/10;
sty[i] = 0.7 + Math.random();
doc_width = document.body.clientWidth;
doc_height = 515;
}
dx[i] += stx[i];
document.all["dot"+i].style.pixelTop = yp[i];
document.all["dot"+i].style.pixelLeft = xp[i] + am[i]*Math.sin(dx[i]);
}
setTimeout("snowIE()",speed);
}
if (ns4up) {
snowNS();
} else if (ie4up) {
snowIE();
}
// End -->
</SCRIPT>