


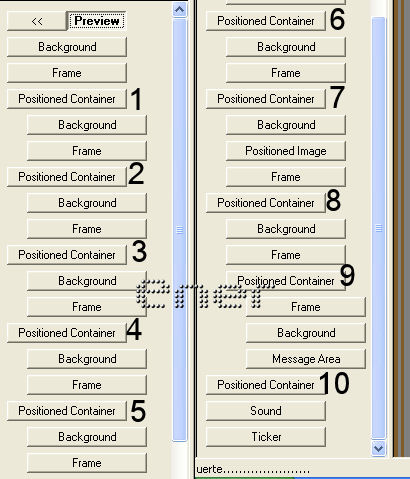
Mirar el estado final de como quedarán los diferentes containers
Abrimos el Scrippy
Le insertamos un background sin scrolling
Insertamos frame, double, width=10, con un color que vaya bien con nuestro fondo, yo le puse el
place over background seleccionado
(primer container)
*Insertar/ container/ positioned container
Horizontal layout
Set position and width, pulsado
position from left= 100 especified size= 75
Vertical layout
set position and height, pulsado
position from top= 30 especified size= 400
Con el positioned container seleccionado insertar background ( en el ejemplo corresponde con el cielo estrellao)
Scrollin= up-left Smooth scroll, pulsado
pixel por second= 10 pixel per move = 1
auto size= tile, pulsado
Insertar frame double, width=10, color que vaya bien con nuestro fondo, place over background no seleccionado
(segundo container)
Pulsamos en preview y con esto pulsado
insertamos container/ positioned container, (fijaros que debe quedarnos el container pegadito a la izquierda y no dentro del otro que hay)
Horizontal layout
Set position and width, pulsado
position from left= 140 especified size= 75
Vertical layout
set position and height, pulsado
position from top= 130 especified size= 300
Con este positioned container seleccionado
insertar el mismo fondo de antes o background
Scrollin= down-left Smooth scroll, pulsado
pixel por second= 10 pixel per move = 1
auto size= tile, pulsado
Insertar frame double, width=10, color que vaya bien con nuestro fondo, place over background no seleccionado
(tercer container)
Volvemos a preview
insertamos container/ positioned container
Horizontal layout
Set position and width, pulsado
position from left= 190 especified size= 50
Vertical layout
set position and height, pulsado
position from top= 230 especified size= 200
Con este positioned container seleccionado insertar el mismo fondo de antes o background
Scrollin= left Smooth scroll, pulsado
pixel por second= 10 pixel per move = 1
auto size= tile, pulsado
Insertar frame double, width=10, color que vaya bien con nuestro fondo, place over background no seleccionado
Ir a preview
Insertar loading message, seleccionarle un color y tiempo 2.9
(cuarto container)
Insertar positioned container
Horizontal layout
Set position and width, pulsado
position from right= 97 especified size= 75
Vertical layout
set position and height, pulsado
position from top= 30 especified size= 400
Con este positioned container seleccionado insertar el mismo fondo de antes o background
Scrollin= up-right Smooth scroll, pulsado
pixel por second= 10 pixel per move = 1
auto size= tile, pulsado
Insertar frame double, width=10, color que vaya bien con nuestro fondo, place over background no seleccionado
Ir a preview
(quinto container)
Insertar positioned container
Horizontal layout
Set position and width, pulsado
position from right= 137 especified size= 75
Vertical layout
set position and height, pulsado
position from top= 130 especified size= 300
Con este positioned container seleccionado
insertar el mismo fondo de antes o background
Scrollin= down-right Smooth scroll, pulsado
pixel por second= 10 pixel per move = 1
auto size= tile, pulsado
Insertar frame double, width=10, color que vaya bien con nuestro fondo, place over background no seleccionado
(sexto container)
Ir a preview
Insertar positioned container
Horizontal layout
Set position and width, pulsado
position from right= 187 especified size= 50
Vertical layout
set position and height, pulsado
position from top= 230 especified size= 200
Con este positioned container seleccionado insertar el mismo fondo de antes o background
Scrollin= right Smooth scroll, pulsado
pixel por second= 10 pixel per move = 1
auto size= tile, pulsado
Insertar frame double, width=10, color que vaya bien con nuestro fondo, place over background no seleccionado
(séptimo container)
Ir a preview
Insertar positioned container
Horizontal layout
Set position and width, pulsado
position from center= 2 especified size= 328
Vertical layout
set position and height, pulsado
position from top=54 especified size= 376
Con este positioned container seleccionado insertar el mismo fondo de antes o background
Scrollin= down Smooth scroll, pulsado
pixel por second= 10 pixel per move = 1
auto size= tile, pulsado
Insertar frame double, width=10, color que vaya bien con nuestro fondo, place over background no seleccionado
Insertar positioned image, ponerle una imagen de aproximado 350x350
Horizontal Posicion= center vertical position= center
(octavo container)
Ir a preview
Insertar positioned container
Horizontal layout
Set position and width, pulsado
position from center= 0 especified size= 610
Vertical layout
set position and height, pulsado
position from top=470 especified size= 500
Con este positioned container seleccionado insertar el mismo fondo de antes o background
Scrollin= up-right Smooth scroll, pulsado
pixel por second= 10 pixel per move = 1
auto size= tile, pulsado
Insertar frame double, width=10, color que vaya bien con nuestro fondo, place over background no seleccionado
(noveno container)
con el ultimo positioned container pulsado
Insertar otro position container (anidado dentro de este)
Horizontal layout
Set position and width, pulsado
position from lef= 20 especified size= 570
Vertical layout
set position and height, pulsado
position from top=20 especified size= 460
Insertarle un frame igual que los otros double, width=10, color que vaya bien con nuestro fondo, place over background no seleccionado
Insertar background no scrolling
con el ultimo positioned container pulsado
Insertar message area
left =30 top= 30 right= 30 bottom= 30
(décimo container)
Volver a preview
Insertar position container
Horizontal layout
Set position and width, pulsado
position from center= 0 especified size= 200
Vertical layout
set position and height, pulsado
position from top=1000 especified size= 40
Insertar sound
Insertar tiker
Tutorial realizado por Piconera y adaptado por EnergiaElca
Derechos reservados